
Project Zomboid Build 42 Multiplayer Not Working? 7 Fixes for Host, Join & Loading World Errors
Project Zomboid is a hardcore sandbox zombie survival RPG, but survival is not the only challenge players face. Even with Build 42 multiplayer now on the Stable branch, players may find Project Zomboid Build 42 multiplayer not working: they cannot Host or Join, encounter an Unexpected Error, or get stuck on Loading World. Older saves and incompatible multiplayer mods may be responsible.
This guide will explain Build 42 multiplayer’s current status and main causes, then provide seven practical fixes for hosting, joining, and loading errors.
Is Project Zomboid Build 42 Multiplayer Working Now?
Project Zomboid Build 42 multiplayer is working now and is available on the public Stable branch. The release includes networking improvements, although The Indie Stone says multiplayer development will continue throughout the Build 42 support cycle.
However, the mode is not problem-free. Some players may still encounter hosting failures, Loading World freezes, Server Failed to Respond errors, or broken multiplayer mods.
Why Is Project Zomboid Build 42 Multiplayer Not Working?
These problems usually do not mean Build 42 multiplayer is disabled. Version mismatches, legacy worlds, bugs, mods, stale data, or network settings may interfere. Check the table below for likely causes and first fixes.
| Symptom | Likely Cause | First Fix to Try |
|---|---|---|
| Unexpected error when hosting | Stalled Host session, UsernameDisguises bug, or incompatible mod | Restart; disable UsernameDisguises if enabled |
| Stuck on Loading World | Slow reconnect, incompatible world/mods, or damaged files | Wait briefly, then restart and repair files |
| Server failed to respond | Build mismatch, unavailable host, or network issue | Match builds and check the host |
| Mods not loading | Incorrect Mod IDs, dependencies, or incompatibility | Update mods and rebuild the lists |
How to Fix Project Zomboid Build 42 Multiplayer Not Working - 7 Useful Fixes
Start with the first fix listed in the table if one row matches your symptom. If it does not work or no row applies, continue with the relevant fixes below in order.
Fix 1. Restart Project Zomboid and Steam
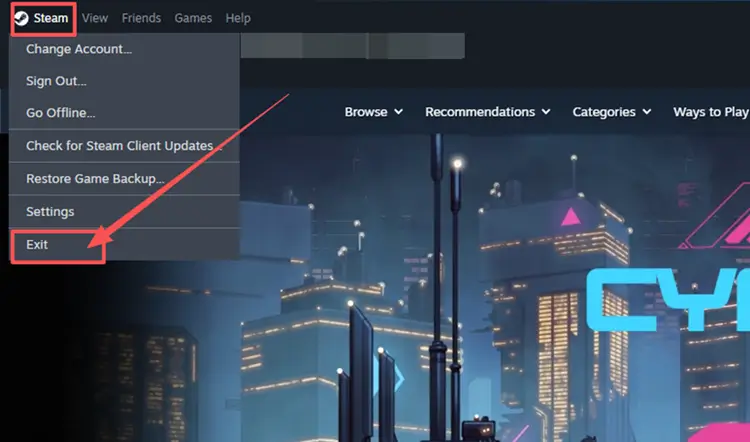
Closing only the game window may leave Project Zomboid or Steam processes running, preserving a failed Host, Join, or Loading World session. A full restart refreshes the Steam session and multiplayer connection before you change server or network settings. Follow the steps below to fully close both processes and start a fresh multiplayer session.
Step 1. Close Project Zomboid. In Steam, select Steam > Exit to shut down the client completely.
Step 2. Press Ctrl+Shift+Esc to open Task Manager and end any remaining Project Zomboid or Steam processes.
Step 3. Reopen Steam, launch Project Zomboid from Library, and try hosting or joining again.
Fix 2. Sync the Game and Server to Build 42.20.2
Different Project Zomboid builds can prevent players from joining a host or dedicated server. Build 42.20.2 is the current Stable version, so install pending updates on every player and host PC. Update and restart any dedicated server through Steam or its hosting panel, then reconnect only after confirming that everyone uses 42.20.2 on the Stable branch.
Fix 3. Disable UsernameDisguises and HideDisguisedUserName
Build 42.20 has a confirmed hosting bug when UsernameDisguises is enabled, while the related HideDisguisedUserName option may trigger the same startup error. Disable both options before starting the affected server. Follow the steps below.
Step 1. Stop the server and open %UserProfile%\Zomboid\Server\<servername>.ini or the same file in your hosting panel.
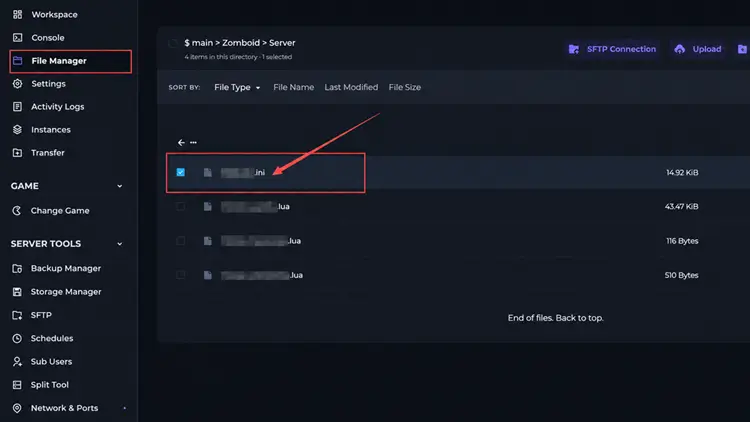
Step 2. Set both values to false, then save the file:
- UsernameDisguises=false
- HideDisguisedUserName=false
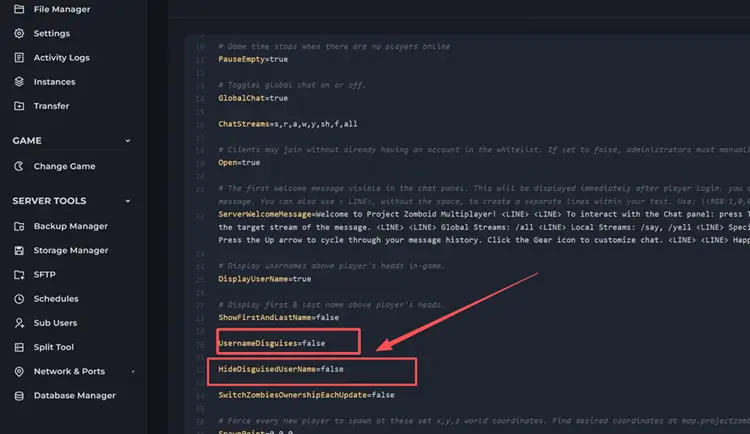
Step 3. Restart the server and try hosting the world again.
Fix 4. Select the Correct Branch for a Build 41 or 42.19 World
Build 41 saves are not compatible with Build 42, while existing 42.19 worlds are incompatible with 42.20.2 To keep using an older world, select its matching legacy branch and ensure the host or dedicated server and every player use it. Follow the steps below to match all participants to the saved world’s branch.
Step 1. Back up the world, then right-click Project Zomboid in Steam Library and select Properties.
Step 2. Open Betas and select legacy41 for a Build 41 world or 42.19 for a Build 42.19 world.
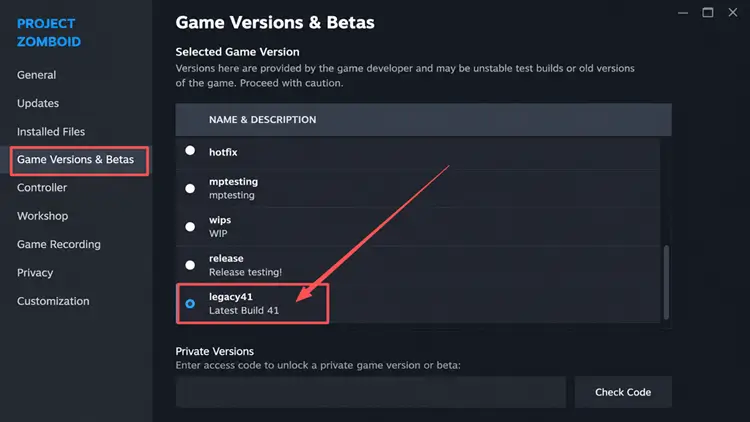
Step 3. Let Steam finish changing versions, then ensure the host or dedicated server and every player use the same branch before reconnecting.
Fix 5. Update Incompatible Mods and Rebuild the Server Mod List
Outdated mods, missing dependencies, or incomplete server lists can cause Build 42 multiplayer hosting, joining, and loading errors. Back up the world before removing unsupported mods and rebuilding the list. Follow the steps below to repair the multiplayer mod configuration.
Step 1. Confirm each mod supports Build 42 multiplayer. Remove unsupported mods and add required dependencies.
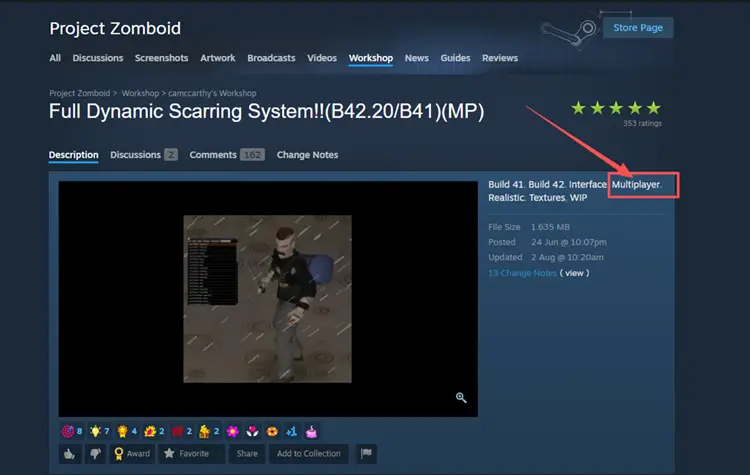
Step 2. Rebuild the multiplayer mod list:
- Steam Co-op: Add every remaining mod under both Steam Workshop and Mods in the affected server preset.
- Dedicated Server: Add all Workshop IDs, including dependency items, to WorkshopItems=. Add each required Mod ID to Mods= using Build 42’s \ModID format and separate entries with semicolons.
Step 3. Save, restart the server, and let all players download the updated mod list before rejoining.
Fix 6. Repair Project Zomboid and Workshop Files
Corrupted game or dedicated server files can trigger crashes, join errors, and Loading World hangs, while stale Workshop downloads may keep clients and hosts on different mod versions. Repair the installation and refresh affected Workshop files before changing the world or reinstalling the game.
👉 Verify Project Zomboid Files
Step 1. In Steam Library, right-click Project Zomboid and select Properties.
Step 2. Open Installed Files and select Verify integrity of game files.
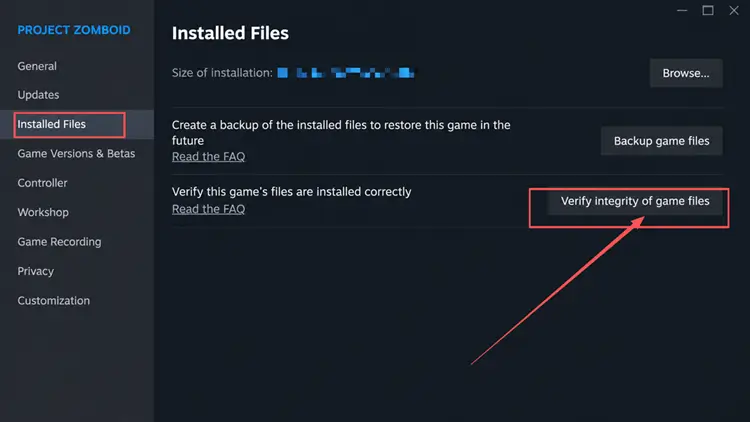
Step 3. If applicable, repeat the process for Project Zomboid Dedicated Server, then restart Steam and the server.
👉 Clear Stale Workshop Files
Step 1. Find the affected mod’s numeric Workshop ID. For Steam Co-op, unsubscribe from it, then close Project Zomboid, Steam, and the server.
Step 2. Delete only its ID-named folder from Steam\steamapps\workshop\content\108600. Dedicated-server hosts should remove its matching cached copy from the server installation.
Step 3. Restart Steam and resubscribe to the mod. If using a dedicated server, restart it and wait for the files to redownload before joining.
Fix 7. Check the Host Firewall and Server Ports
If multiplayer works locally but friends receive Server Failed to Respond, the host firewall or router may be blocking traffic. Allow Project Zomboid and Steam through Windows Firewall instead of disabling protection. For Steam Co-op, restart the hosted session and ask the affected player to rejoin through a fresh Steam invitation.
For a self-hosted dedicated server, forward UDP ports 16261 and 16262 to the server PC’s local IPv4 address and permit them through its firewall. Ensure the configured port matches what players enter.
[Bonus] Improve Project Zomboid Multiplayer Connection Stability with LagZapper
Project Zomboid multiplayer depends on a stable route when joining Steam Co-op or dedicated servers and exploring a shared world. If hosting and joining already work but high ping, packet loss, or unstable routing disrupts gameplay, LagZapper can optimize the connection route for a smoother session.
Why Use LagZapper for Project Zomboid?
- Smart Route Optimization: Finds a more stable route to help reduce high ping, packet loss, jitter, and routing problems.
- Connection Stability: Helps reduce game lag, lower ping, and limit sudden latency changes during multiplayer sessions.
- One-Click Boost: Optimizes the connection without manual router, DNS, or Windows changes.
- 3,000+ Game Support: Works across more than 3,000 online games.
How to Use LagZapper for Project Zomboid
Download LagZapper for Windows and follow the on-screen instructions to complete the installation on your PC.
Step 1. Download and Install LagZapper
Download LagZapper for Windows and follow the on-screen instructions to complete the installation on your PC.
Step 2. Search for Project Zomboid
Launch LagZapper, then use the search bar or browse the supported games list to find Project Zomboid.
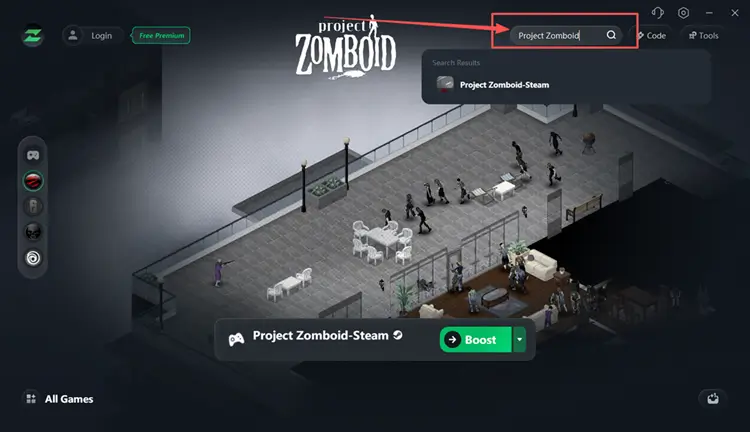
Step 3. Select a Server and Click Boost
Select a suitable server or recommended node, then click Boost before launching Project Zomboid.
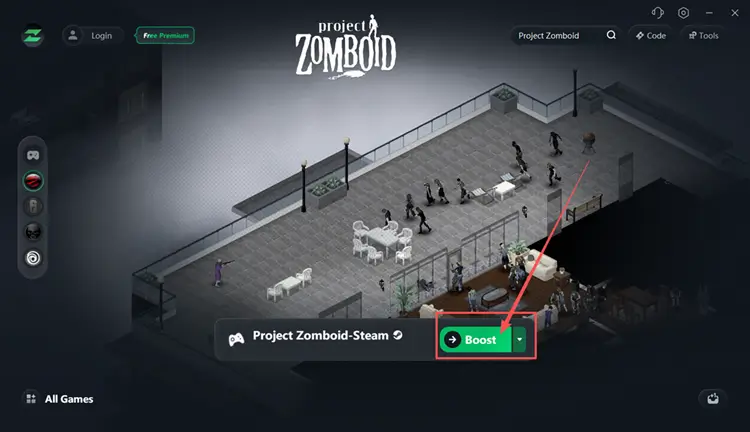
The Bottom Line
Project Zomboid Build 42 multiplayer not working is usually caused by mismatched versions, legacy worlds, known server bugs, incompatible mods, damaged files, or blocked ports. Use the symptom table to choose the most relevant first fix, then continue through the remaining checks only if the hosting, joining, or Loading World problem continues.
Once multiplayer works normally, download LagZapper if high ping, packet loss, or inefficient routing still affects connection stability.
FAQs About Project Zomboid Build 42 Multiplayer Not Working
Q1. Why Is Project Zomboid Build 42 Multiplayer Not Working?
Version mismatches, legacy worlds, known bugs, incompatible mods, stale files, or blocked traffic may interfere.
Q2. How Do I Fix Project Zomboid Build 42 Multiplayer?
Restart Steam, sync builds, correct server settings, select the right branch, and repair files and ports.
Q3. Why Is Project Zomboid Build 42 Stuck on Loading World?
Reconnect bugs, legacy world data, incompatible mods, or stale Workshop files may stall world loading.
Q4. Why Are Project Zomboid Build 42 Multiplayer Mods Not Working?
They may lack Build 42 multiplayer support or be missing from Workshop and Mods lists.
Q5. Why Does Project Zomboid Say Server Failed to Respond?
Build mismatches, an offline host, firewall rules, closed UDP ports, or CGNAT can block connections.